This Tutorial assumes you will use the time shown on the Activity Monitor for Livestreaming.
1) Preperations
You need:
1 Laptop for Livestreaming with the latest versions of SET and OBS installed.
1 Laptop for Scoring on the Tatami with the latest version of SET installed.
A Network for those 2 Laptops.
2) Start the LS Laptop and connect it to the network
Depending on which kind of Internet access you have (LAN or WLAN) you need to decide on how to connect the LS Laptop to the local network.
Each Laptop usually only can connect to one network via LAN and to one additional network via WLAN.
That means:
Your internet connection is via LAN → connect to the local network via WLAN.
Your internet connection is via WLAN → connect to the local network via LAN.
For the best livestream possible it is best to connect to the internet via LAN.
3) Setup the Tatami Laptop to send Time in Kumite
3.1) Setup SET on your LS Laptop
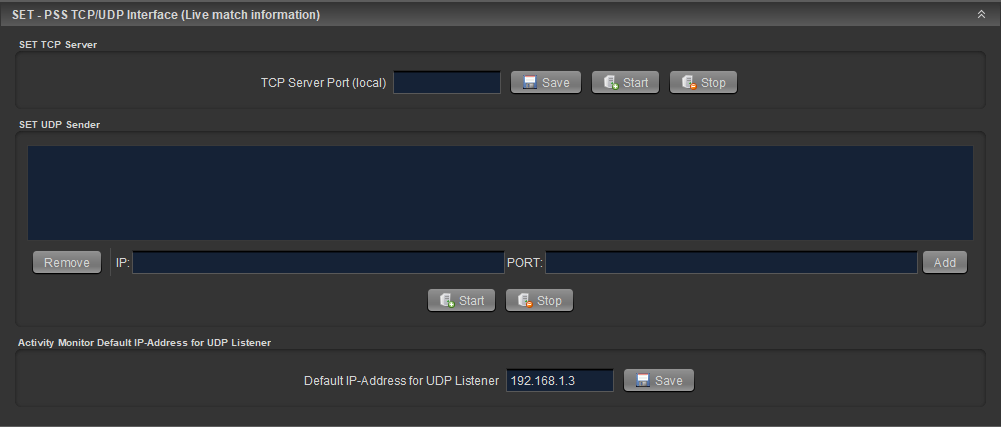
Panels → Data Services → SET PSS TCP/UDP Interface (Live match info.):
Add your Laptops own IP address in the field on the bottom (Default IP-Address for UDP Listener).
The IP address you put in need to be the one from the network the Tatami Laptops are also in!
3.2) Setup SET on the Scoring Laptop
Panels → Data Services → SET PSS TCP/UDP Interface (Live match info.)
Add the LS Laptops IP address to the SET UDP Sender field.
It’s the one you used just before.
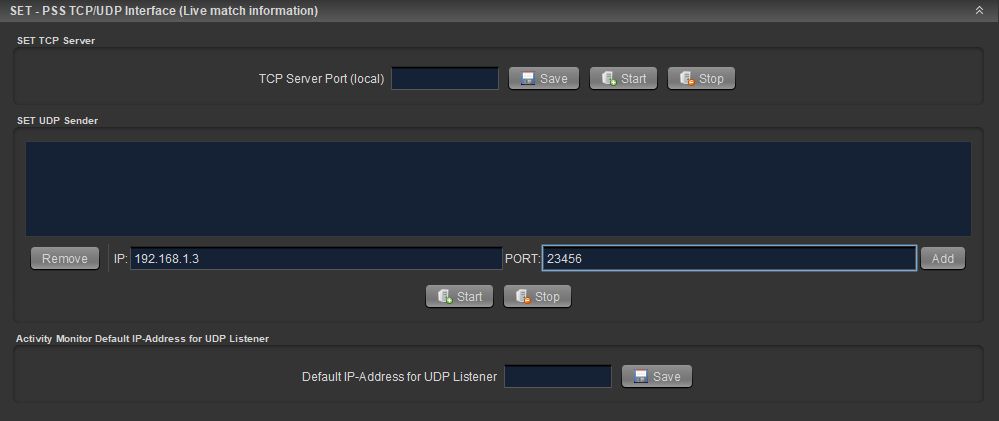
In the field PORT insert: 23456
Press “Add”, then “Start”. If done correctly you will see a message in the message console.
4) Start Activity Monitor
Open SET on your LS Laptop
Panels → Set Monitor → Activity Monitor → SET Activity Monitor (Refresh)
Do not minimize SET Activity Monitor!
Minimizing SET AM will cause it to not update anymore.
5) Start DTM
Open SET on your LS Laptop:
Panels → Set Monitor → SET DTM Monitor (Refresh)
Do not minimize SET DTM!
Minimizing SET DTM will cause it to not update anymore.
6) Getting the Activity Monitor and DTM into OBS
You need to do the following twice:
Sources → + → Window Capture → create new → input a name
(it’s a good idea to name them “Activity Monitor” and “DTM”, respectively)
Under “Window” select “[javaw.exe]: SET -Activity Monitor” (or SET -DTM).
Uncheck “Capture Cursor”!
Now move the windows to where they look nice and fit their size so the text is readable.
The DTM will most likely have a black bar on the right side.
To remove it rightclick on DTM in Sources → Transform → Edit Transform → Add a value of around 30 to “Crop Right”.
Keep in mind, that the AM needs more space when the scores are shown at the end.
Do not minimize SET Activity Monitor or SET DTM!
6.1) Making DTM and AM transparent
To make the stream look more professional it is a good idea to add a transparency effect to the AM and DTM.
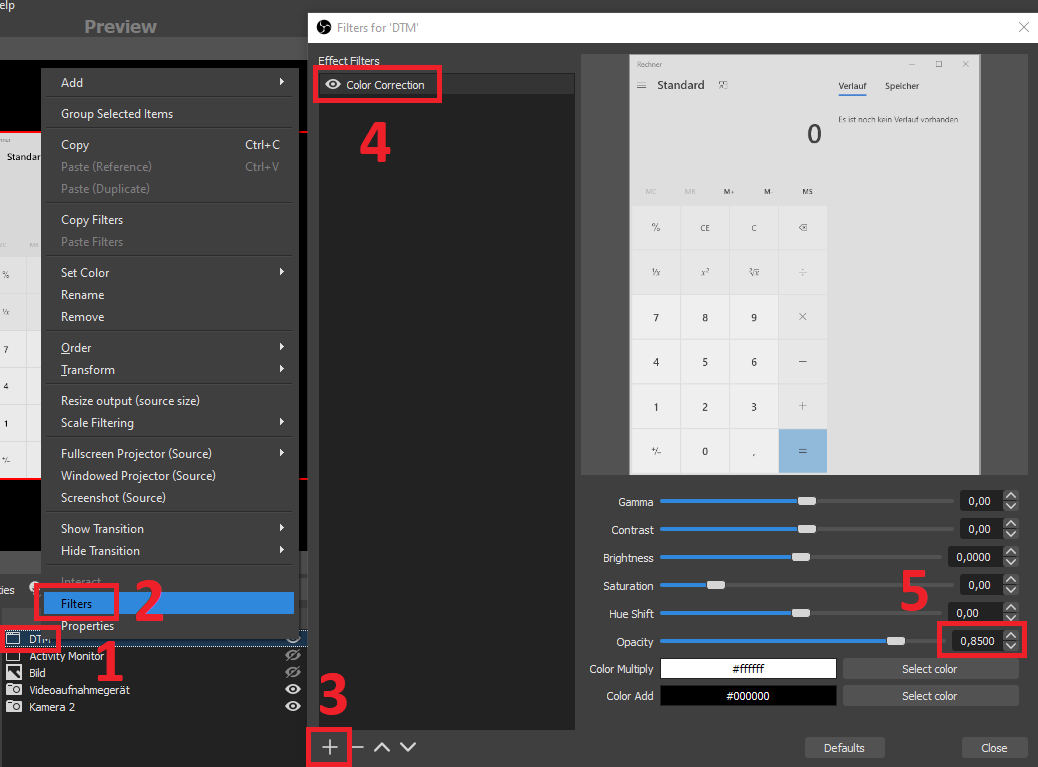
1) right click the AM/DTM under Sources
2) select “Filters”
3) click on the plus symbol in the lower right of the pop up screen
4) add a color correction
5) for opacity use: 0.8500
7) Switch between Activity Monitor and DTM
While a fight is going on its best to show just the AM and show the DTM only in the times in between.
To do this select the eye symbol next to AM / DTM under Sources.

Then do a transition by clicking on the “Transition” button, to get the changes to the actual video:
![]()
Troubleshooting:
Here is a list of some common errors and how to fix them.
1) DTM and/or AM is not showing despite being activated (eye symbol active)
Fixes:
• Your elements in Sources have layers, so the DTM/AM might lie “under” your video.
Click once on DTM/AM in Sources, then click on the Up-button in sources until DTM/AM is in the top of the list.
If it is still not showing check point 2.
2) DTM and/or AM is not showing the current match or not showing anything
Fixes:
• Go to SET → SET Monitor and refresh DTM/AM
• If SET is frozen → restart SET → open DTM/AM again
When livestreaming SET might freeze because your processor is overburdened.
In OBS this is shown on the lower right corner.
If your CPU consistently shows over 80% you should check your settings and change them accordingly, if that doesn’t work the problem usually lies with your computer.